Settings
Hotel: properties, profile and policy
One screen for a property's identity, the rules it runs by, and what a channel is shown — create a property, write its description, and set photos, facilities and policy.
Last updated
Who this is for: Owner, Manager — requires
hotel.settings.manage; creating a property additionally requireshotel.create. The Photos and Facilities tabs, and the description field on Profile, additionally requirecrs.content.write, which the default Manager bundle also carries. Where: Settings → Hotel
This is one screen, four tabs, for everything that describes a property — what it is, the rules it runs by, and what a guest and a channel are shown before they book. It used to be three separate places: Properties, Hotel Settings, and a CRS screen called Property Content. All three landed here, split by concern rather than kept as three transplanted tabs.
Note
Everything on every tab applies to the active property — whichever one is selected in the switcher at the top of the sidebar. In a group, check the switcher before you edit.
Profile — what the property is#
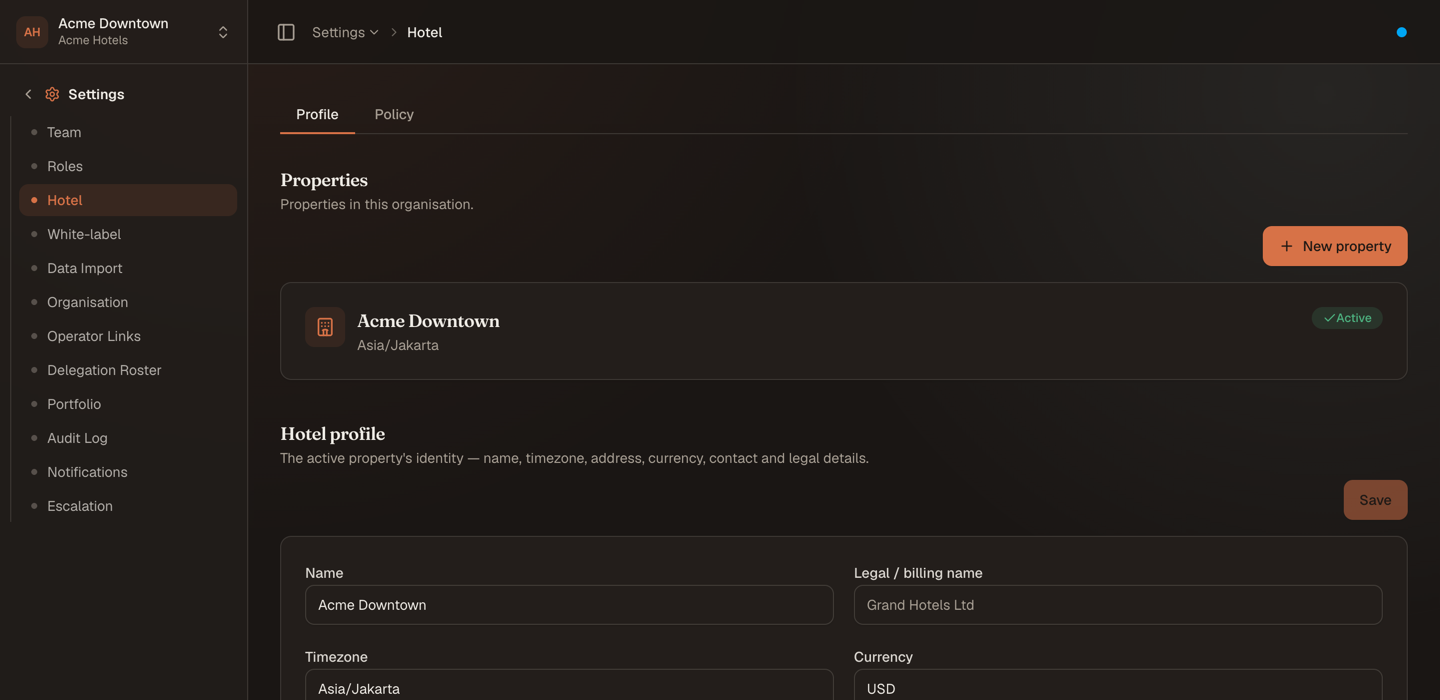
The organisation's properties, then the active one's identity.
Properties lists every property in the organisation with its timezone and whether it is active, and is where you add another one. Creating a property asks for only a name and a timezone — everything else is edited afterwards, here.
Hotel profile is the property's identity. Four of these fields do real work rather than merely labelling things:
| Field | What it decides |
|---|---|
| Timezone | The one clock every date and time in Nerve is rendered in — not the reader's, not the browser's. An arrival at 23:00 belongs to the night the property is having. |
| Currency | The ISO-4217 currency every amount for this property is carried and displayed in. |
| Formatting locale | How this property writes numbers and dates — 1.234,56 or 1,234.56. Independent of the language each person reads Nerve in. |
| Legal / billing name | The name that appears on documents, when it differs from the trading name. |
Address, contact details and coordinates complete the record and feed the documents and listings that quote them.
Property description sits at the foot of this tab, for anyone holding crs.content.write. It is the narrative a channel shows above the fold — write it for a guest choosing between listings, not for a search engine.
Policy — the rules it runs by#
Select the Policy tab.
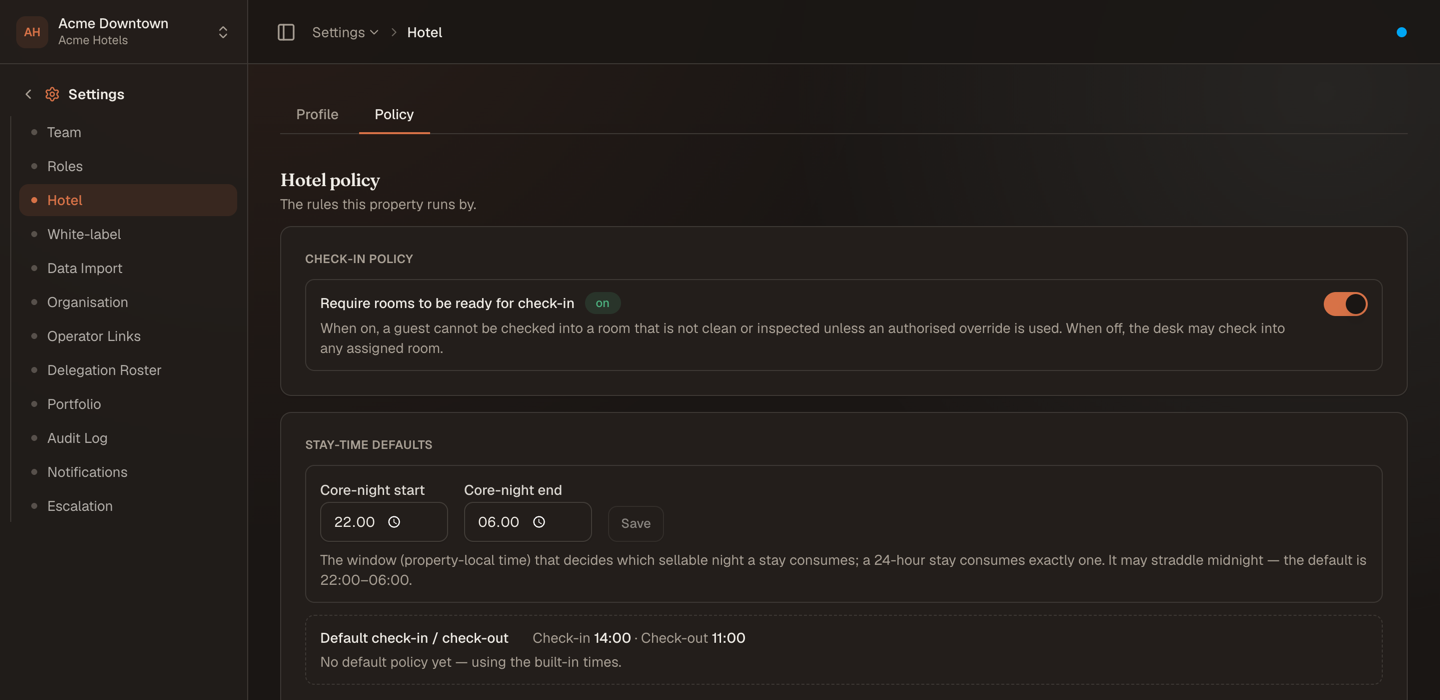
Two settings that change what the front desk is allowed to do.
Require rooms to be ready for check-in. With it on, a guest cannot be checked into a room that is not clean or inspected unless an authorised override is used. With it off, the desk may check into any assigned room. This is the single setting that decides whether housekeeping status is advisory or binding at your house.
Core-night window. The hours — in property-local time — that decide which sellable night a stay consumes. The default is 22:00–06:00, and it may straddle midnight. A 24-hour stay consumes exactly one night. This is what makes a day-use booking and an overnight booking count correctly against the same inventory.
Default check-in / check-out shows the times in force, read-only, and links onward to Stay-Time Policies — listed further down this same tab — where a particular rate or segment needs different ones.
Important
There is no separate, independently-editable copy of check-in/check-out times any more. A property content screen used to let you publish a check-in time to channels that differed from what the desk actually ran — a house could tell Booking.com 15:00 while operating on 14:00. That could never happen now: what a channel is told is derived from the same default stay-time policy the desk reads, so the two cannot disagree.
Photos — what a channel shows#
Select the Photos tab (requires crs.content.write).
- Paste the photo's URL — it must already be hosted somewhere public.
- Write a Caption.
- Attach it to the Property, or to one room category.
- Choose its kind — Photo, Ad or Menu.
- Set its Position —
0is the cover image. - Select Add.
Each photo shows its publish state — unpublished, publishing or published — so a distribution still in flight is visible rather than assumed. Attach room photos to their room category rather than to the property: a channel that can show per-room imagery will use them, and one that cannot ignores them.
Publish to a channel#
Below the photo list, Publish to channel lists every connected channel with its own button. Selecting one pushes the whole content payload — description, photos, facilities — to that channel in one action. With no channels connected, the section says so.
Note
On staging, publishing runs against an in-process stub. Publish states are real; nothing reaches a live channel listing.
Facilities — the controlled vocabulary a channel maps#
Select the Facilities tab (requires crs.content.write).
Attach facilities from the catalog, at property level or per room category:
- Choose a facility from the catalog dropdown.
- Choose the target — the property, or one room category.
- Select Attach.
Facilities are a controlled vocabulary rather than free text, which is what lets a channel map them onto its own filters — a guest filtering for air conditioning finds you only if you claimed it from the list. Remove one with the small delete control on its badge.
Note
Internet access and parking are facility attachments now, not fields on a separate policy form — attach
Free WiFiorOn-site parkingfrom the catalog the same way you would attach any other facility. There is no dedicated "internet: free/paid" or "parking: on-site/nearby" selector any more; the catalog entry is the fact.
Where the rest of the old Property Content screen went#
A CRS screen used to hold a fifth section — a typed policy form with pets, smoking, adults-only, max guests and child age bands — as well as everything above. That form is gone entirely, not merged onto a tab. Each fact it used to carry now has exactly one home, so nothing can disagree with itself any more:
| Old field | Where it lives now |
|---|---|
| Check-in / check-out time | The default stay-time policy, read-only on the Policy tab above |
| Internet access, parking | Facility catalog attachments, on the Facilities tab above |
| Max guests | The room category's occupancy — Settings → Room Category |
| Pets, smoking, adults-only, child age bands | Per room type, on Settings → Room Category |
What a channel is told is composed from those sources at publish time, so there is nothing left here for them to contradict.
Deep links keep working#
The tab is in the address, so ?tab=policy, ?tab=photos or ?tab=facilities opens that tab directly. /crs/content — the old screen's address — still resolves, to the Photos tab, the closest heir to what that screen became. A link you paste into a message reopens on the half you were talking about, and the breadcrumb still names the page.
How it connects#
- Timezone and currency set here are what every other screen renders in — the rack, the folio, the revenue series.
- Which apps this property runs is a separate switch, self-service now — see Installing and enabling apps for a property.
- The words the property uses for these concepts can be overridden — see White-label.
- Who may edit any of this comes from Team and Roles.
- A channel only shows what you publish here. See connecting a channel for mapping a channel in the first place, and listings and vanity properties when one hotel needs more than one storefront.